Recently got a question about extending vlans to a new target infrastructure using HCX. Nothing specially new if you are familiar with HCX, and starting from the fact that NSX-T 2.4 or higher is a mandatory requirement which have to be installed at destination. In relation to the source environment, the desired network to be extended must be configured on a Distributed Virtual Switch Portgroup or NSX Transport Zones.
The question was about extending to a NSX-T Transport-Zone with a VLAN Traffic type. This is not supported by HCX and it is quite specific in the official documentation:
“NSX-T Overlay and NSX-T VLAN networks are always created as NSX Overlay networks at the destination. HCX network extension is always to NSX Overlay networks. Pre-created segments in the vSphere Distributed Switch, CVDS, or VLAN transport zone, cannot be used as a destination.”
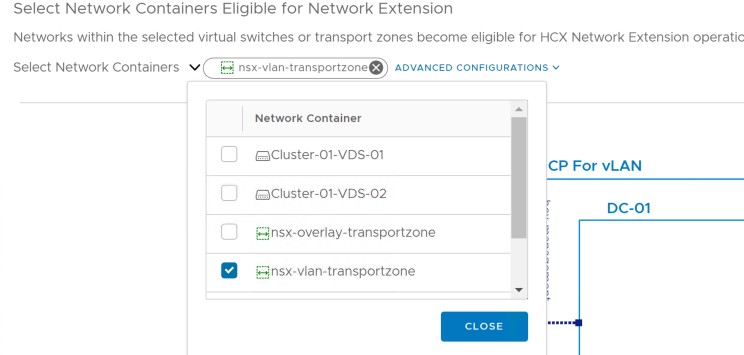
However, you still can define a Compute Profile where the VLAN Transport Zone is selected.
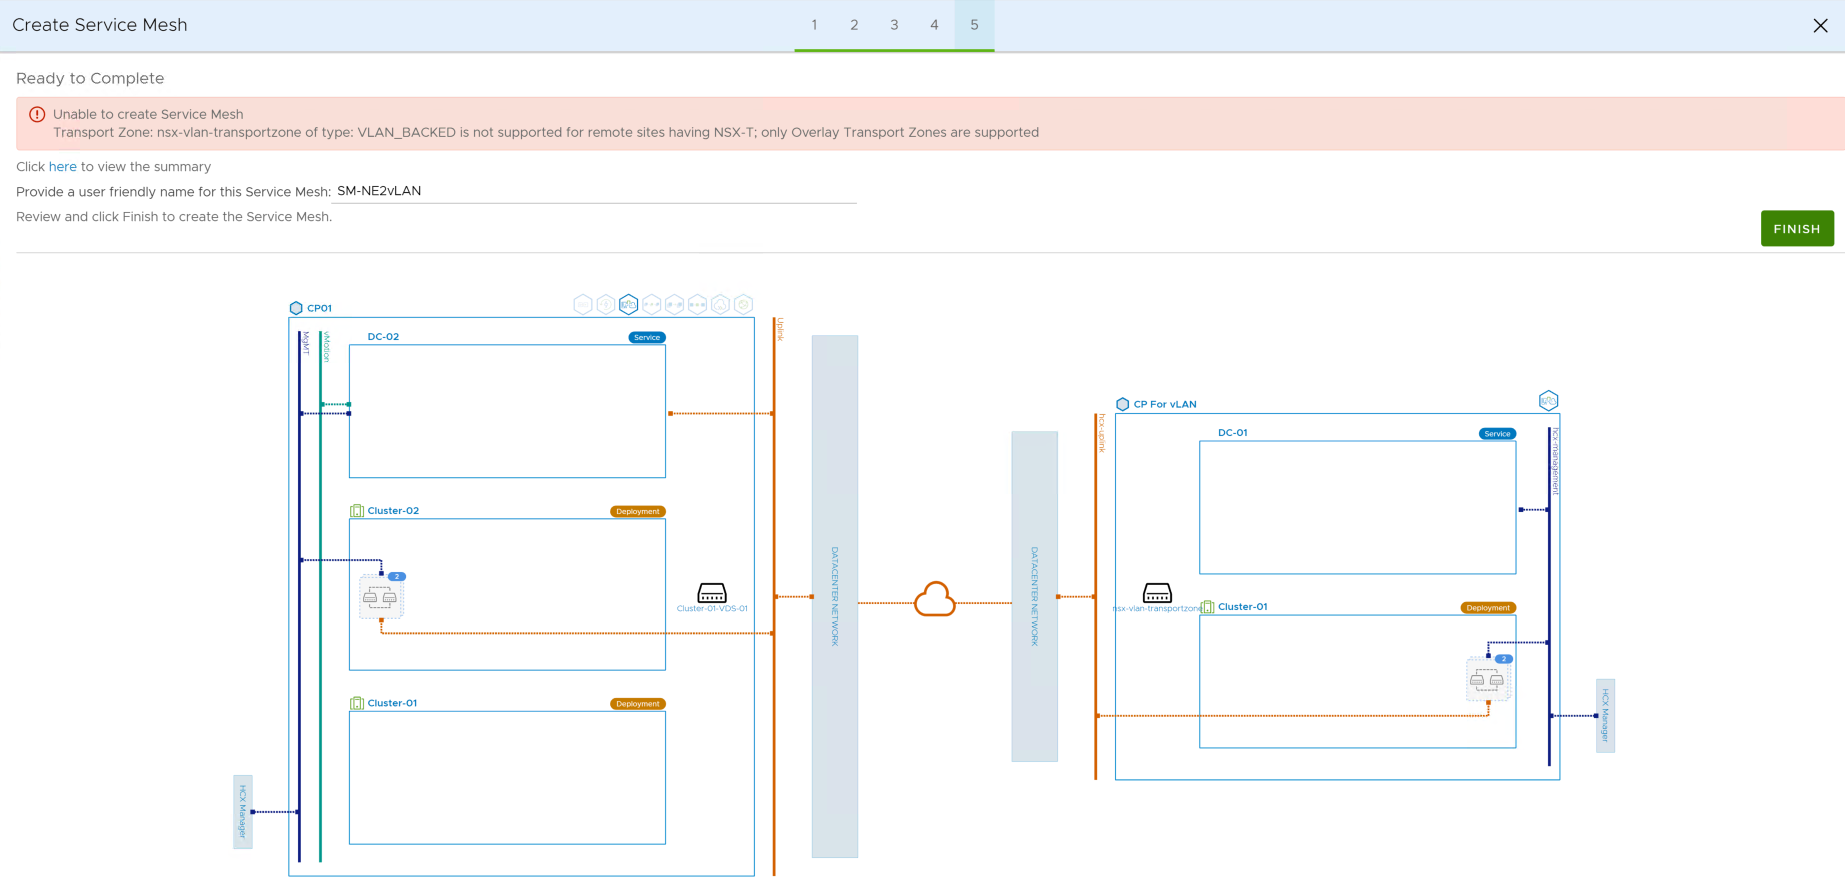
Do not bother, don’t waste time. It is true that doing that we could then create a Service Mesh with only the Network Extension Service enabled and use it to start migrating to a VLAN Type Transport Zone. Well, don’t go there, not sure why we are able to create a CP but in the end the SM configuration will fail.
At least we tried. “Better to Have Extended a Network and Lost than Never to Have extended at All” 😉
On this post, I’ll try collect some valuable information and put it altogether. I hope it could be useful. All details written are related to vSAN OSA. I’ll try to mention the new vSAN ESA features sometimes, but the intention here is talk about the Original Storage Architecture… so far 😉
vSAN Encryption supports Hybrid and All-Flash vSAN Clusters. This applies for OSA since ESA is only supporting All- flash for the whole Storage Pool. There are vSAN Encryption methods supported, Data-at-Rest Encryption and Data-in-Transit Encryption. Both are configured independent of each other and configured at cluster level. vSAN OSA does a Cluster Wide Encryption. HCI Mesh does not support Data-at-Rest Encryption
Data-In-Transit Encryption:
vSAN can encrypt data in transit, as it moves across hosts in your vSAN cluster. When you enable data-in-transit encryption, vSAN encrypts all data and metadata traffic between hosts. Encrypted vSAN traffic exchanged between vSAN nodes uses a message authentication code to ensure authentication and integrity, then adopts a native proprietary technique to encrypt the vSAN traffic.
Process to encrypt traffic across nodes in the vSAN cluster can be summarized on three main steps:
A TLS link between vSAN nodes is created to exchange the traffic.
vSAN nodes create a shared secret and attach it to the current session.
Uses the shared secret to establish an authenticated encryption session between nodes.
Data-at-Rest Encryption:
vSAN’s Data-at-Rest Encryption securely encrypts vSAN data using AES-256, as it is written to cache and capacity devices. While using this method we get the following:
Encrypts Data residing on cache and capacity devices
Supports All-Flash and Hybrid configurations
Eliminates the need for self encrypting drives
Validated with FIPS 140-2
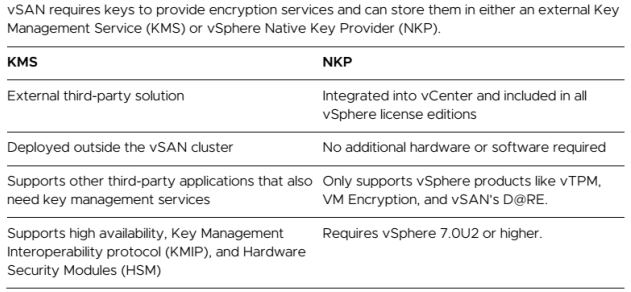
Of course , choosing Data-at-Rest Requires either a Key Manager Service (KMS) or vSphere Native Key Provider (NKP) and it is configured at the cluster level.
vSAN Data-at-Rest Encryption (D@RE) helps protecting against situations of device loss or theft. vSAN D@RE is separate from vSphere VM Encryption (VM Encryption). vSAN D@RE is an inline process which encrypts the data before it lands on a disk. Data is never stored on a disk in an unencrypted state. If an environment is using deduplication and compression or compression-only, encryption occurs after deduplication and compression or compression-only operations, allowing the customer to take advantage of space savings before encrypting. When the data is read, data is decrypted while in transit and returned to the guest OS. The data on the disk remains in an encrypted state.
vSAN encryption is Federal Information Processing Standard (FIPS) 140-2 compliant. FIPS is a joint program between the National Institute of Standards and Technology (NIST) and the Communications Security Establishment (CSE) to set a security standard.
KMS is a solution from an external vendor. The customer needs to decide which product will be using, meaning it needs some research and time to test and maintain it. Nowadays majority of customers finds that encryption does not worth the effort.
As a result, VMware developed vSphere Native Key Provider (NKP). NKP is a solution built into vSphere. NKP requires no additional licenses, external products, or additional clusters. The bar to implementation is very low. NKP goal is to increase adoption of vSAN D@RE.
VMware vSAN 8 brings us a revolutionary new architecture called Express Storage Architecture (ESA). It is presented as a revolutionary and alternative option to the existing architecture up to now, which is now called Old Storage Architecture (OSA). Of course, both are fully valid and supported in vSAN 8.
ESA is conditioned to those vSAN ReadyNodes with certain and select hardware requirements, capable of offering unparalleled high performance, as well as greater resilience and scalability. So that we are clear, vSAN 8 is going to be able to take advantage of all the potential that current technology is offering. We start with juicy details:
I wanna know what we are talking about
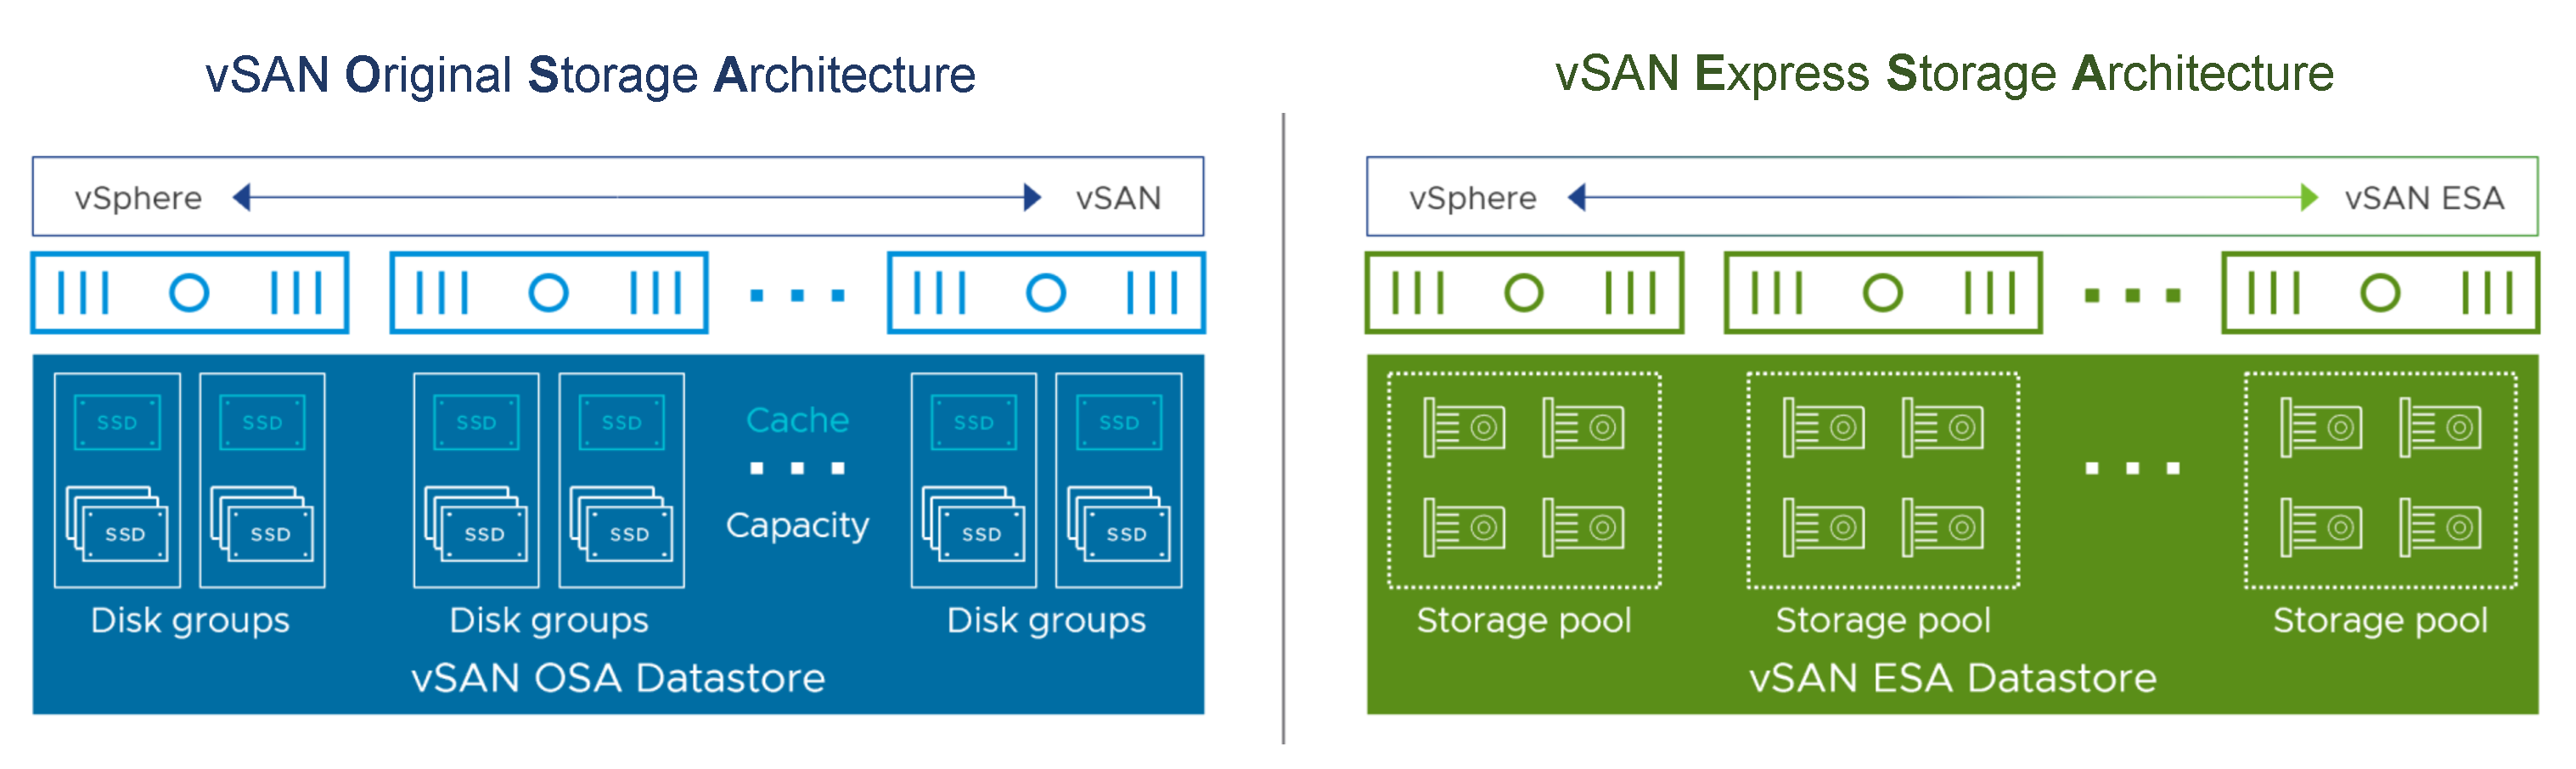
From a design perspective, a new structure for its file system called vSAN Log File System (vSAN LFS) is now used here. From an administrative perspective, the main change – beyond performance and simplicity, which is its immediate effect – is moving from a Dual Tier to a Single Tier model. What do these words mean to us? Well, basically the Disk Cache / Disk Capacity duality disappears, the disks in the ESA model are grouped in a Storage Pool, all the disks are independent and all are dedicated for storage, therefore everything will be much simpler and more transparent. In addition, we will not be subject to a calculator to determine how many disks we need and of what type, here the maximum number of disks will be limited by the number of slots available in our node. However, the minimum necessary will be 4 disks.
And how do you get this? Well, obviously Hybrid configurations will cease to exist, everything will be All-flash, specifically and exclusively NVMe based on TLC Flash devices and a minimum of 25 Gbps will be required in our vSAN network. Next I leave a table with the main differences between both architectures.
Tell me about performance, Capacity and Security
Previously, with vSAN OSA, a careful plan was made to decide which type of policy to use based on storage performance and usage. vSAN ESA allows the use of disk advantages of a RAID-6 with the performance of RAID-1, something unthinkable until now. Additionally, the compression mechanism is performed before reaching the network, avoiding network overhead. There is also a new and more efficient Snapshot generation method.
This change also affects capacity, and vSAN OSA has turned around what we had internalized so far in terms of storage policies. If using RAID-6 with the performance of RAID-1 wasn’t interesting enough, now RAID 5 can also operate in a 2+1 or 4+1 configuration, which will allow us to have an entire cluster with just 3 nodes, with RAID 5 storage, resulting in greater efficiency in terms of space.
vSAN ESA uses a much more efficient new file system structure, which is necessary to handle storage management by treating disks independently and without relying on the cache tier. This not only eliminates a single point of failure at the Disk Group level, but now all disks are used for capacity. Another benefit of this structure is that compression can now achieve a 4x higher ratio than the OSA architecture, up to 8:1 for 4 KB blocks. Additionally, compression is applied at the object level, not at the Disk Group level. It’s important to note that the “Compression Only” option is enabled by default, although we can later use policies to prevent it from being used on our VMs.
In terms of security, there is also an important difference, the vSAN Express Storage Architecture applies encryption at the host level where the virtual machine runs. Data only needs to be encrypted once it is stored, and it is no longer necessary to decrypt and re-encrypt it when moving from cache memory to capacity devices. In other words, the encryption that was previously performed at the cluster level is now performed at the object level. This minimizes CPU and IO amplification penalties. Worth mentioning here that ESA Encryption can only be activated during cluster creation, and cannot be activated later. A nice warning will remind it during the vSAN Cluster initial setup.
Finally, I would like to mention an improvement with regards to Snapshots. Basically, from vSAN 6.0, a method called vsanSparse was used, based on redo logs – essentially putting the vmdk in read-only and creating a new child disk to write changes to. In OSA, a new structure called the B+tree logical map is used, without technical details, when we create a Snapshot, it points to different data blocks distributed in our vSAN Datastore. In summary, it improves consolidation time, which benefits all backup tools that use the API to create backups. Note that degradation due to snapshot usage is still there, so don’t overuse them and remove them once their purpose is served.”
That’s a short details about new vSAN 8.0 ESA model. Coming soon I’d like to share details about storage policies.
VMware vSphere 8 has already been with us for a few months and, after this time, we are discovering new features as this version is being rapidly adopted . There are many changes and improvements, from my point of view, these would be some of them regarding the administration and operation of vSphere:
vNUMA Configuration and Visualization
Interesting candy we have here. Rarely considered, but with a high importance for the performance is the existing NUMA Nodes and their perfect alignment with the vCPUs of our Virtual Machine. It’s only when we perform a Healthcheck of the environment or a performance study that we remember this concept, which has existed since vSphere 5.0. In vSphere 8 and under the Virtual Hardware 20, it is possible to configure the NUMA topology from the vSphere Client, thanks to a new tab in Summary, called CPU Topology
Staging Cluster Images
Just like we did with Update Manager Baselines, now it’s possible to stage the ESXi images of a cluster for later Remediation. We can do it for all the hosts in a cluster with just one click. Moreover, it is no longer necessary for them to be in Maintenance Mode to perform this task.
Parallel Remediation
Why update only one host when you can do several at once? In vSphere 8 we can perform the ESXi Remediation in parallel. We decide which hosts to put in MM and the Lifecycle Manager will take care of the process applying the Remediation on those hosts, up to a total of 10. Easy and painless.
Enhanced Recovery of vCenter
Another sweet candy. Do you remember the divine punishment of restoring a vCenter from Backup? Well first of all. Do you Backup your vCenter Server? If the answer is “No”, well, stop reading, go directly to the VAMI and make a backup to your favorite SFTP. As a wise man said “Your restore will fail if there is no Backup”. Anyway, Here’s another great improvement when restoring your cluster from vCSA.
After start a restore operations, If there have been changes in our clusters since the backup was made, inconsistencies can occur during the restoration process but. in vSphere 8 our newly restored vCenter is able to identify what is missing in its inventory and update itself with real-time data. This is achieved by distributing information portions among the ESX called DKVS or Distributed Key-Value Store
DRS and Persistent Memory
In vSphere 8, DRS performs an analysis of memory usage by various workloads using PMEM (Persistent Memory). As a result, migration in this way does not affect performance.
vSphere Configuration Profiles
In the same way that we used Host Profiles to quickly configure new Hypervisors, vSphere 8 presents vSphere Configuration Profiles. This time to be able to define configuration elements of the objects in a cluster. Very similar to how the already mentioned LCM Cluster Images work. There is a lot to try here if we can really use those configuration objects to later apply them to another cluster.
Enough for today. But there would be more things to come. Next time I will comment on news related to vSAN 8.
VMware vSAN 8 nos acerca una nueva y revolucionaria arquitectura denominada Express Storage Architecture (ESA). Se presenta como una opción revolucionaria y alternativa a la, hasta ahora, arquitectura existente, que pasa a denominarse Old Storage Architecture (OSA). Por supuesto, ambas son totalmente válidas y soportadas en vSAN 8.
ESA viene condicionado a aquellos vSAN ReadyNodes con ciertos y selectos requisitos de hardware, capaces de ofrecer un altísimorendimiento sin parangón, además de una mayor resiliencia y escalabilidad. Para que lo tengamos claro, vSAN 8 va a ser capaz de sacar partido a todo el potencial que la tecnología actual está ofreciendo. Empezamos con detalles jugosos:
¿Pero bueno, de qué estamos hablando?
Desde un prisma de diseño, aquí ahora se utiliza una estructura nueva para su sistema de ficheros denominada vSAN Log File System (vSAN LFS). Desde una perspectiva administrativa, el cambio principal – más allá del rendimiento y simplicidad, que es su efecto inmediato – es pasar de un modelo Dual Tier a Single Tier. ¿Qué significan estos palabros para nosotros? pues básicamente desaparece la dualidad Disco Caché / Disco Capacitad, los discos en el modelo ESA se agrupan en un Storage Pool, todos los discos son independientes y todos están dedicados para almacenamiento, por ello todo resultará mucho más sencillo y transparente. Además, no estaremos sujetos a una calculadora para determinar cuantos discos necesitamos y de qué tipo, aquí el número máximo de discos lo limitará la cantidad de slots disponibles en nuestro nodo. No obstante el mínimo necesario serán 4 discos.
Y como consigue esto?. Pues obviamente dejarán de existir configuraciones Híbridas, todo será All-flash, concreta y exclusivamente NVMe basado en dispositivos TLC Flash y se requerirá un mínimo de 25 Gbps en nuestra red de vSAN. Seguidamente dejo una tabla con las principales diferencias entre ambas arquitecturas.
Más detalles sobreRendimiento, Capacidad y Seguridad
Anteriormente, con vSAN OSA se realizaba un cuidadoso plan para decidir que tipo de política se iban a utilizar en función del rendimiento y uso del almacenamiento. vSAN ESA permite disponer de las ventajas de uso de disco que tiene un RAID-6 con el rendimiento de RAID-1, algo impensable hasta ahora. Adicionalmente el mecanismo de compresión se realiza antes de llegar a la red evitando overhead en la red. También existe nuevo método de generación de Snapshots más eficiente.
Este cambio también repercute en la capacidad y es que vSAN OSA nos ha dado un poco la vuelta a lo que teníamos interiorizado hasta ahora en lo que respecta a las políticas de almacenamiento. Por si eso fuera poco interesante usar RAID-6 con el performance de RAID-1, ahora RAID 5 también puede operar en una configuración 2+1 o 4+1, algo que nos va a permitir poder disponer de todo un cluster de tan solo 3 nodos, con almacenamiento en RAID 5, beneficiándonos de una mayor eficiencia en términos de espacio.
vSAN ESA usa una nueva estructura en su sistema de ficheros mucho más eficiente, esto es necesario para poder acometer la gestión de almacenamiento tratando los discos de forma independiente y sin contar con el Tier de Caché.Que no solo elimina un punto de fallo que teníamos a nivel de Disk Group sino que ahora todos los discos son usados para capacidad. Otro beneficio de esta estructura es que la compresion ahora puede alcanzar un ratio 4 veces superior a la arquitectura OSA, es decir, hasta un 8:1 para bloques de 4 KB. Además, la compresión se aplica a nivel de objeto, no a nivel de Disk Group. Importante mencionar que la opción “Compression Only” viene activada por defecto, aunque posteriormente podemos usar políticas para que no se usen en nuestras VMs.
En lo que respecta a seguridad también hay una diferencia importante, y es que vSAN Express Storage Architecture aplica la encriptación a nivel del host en dónde se ejecuta la máquina virtual. Los datos solo deben cifrarse una vez que están almacenados, ya no es necesario descifrarlos y volverlos a cifrar al pasar de la memoria caché a los dispositivos de capacidad. Por decirlo de otro modo, la encriptacion que antes se realizaba a nivel de clúster, ahora se realiza a nivel de objeto. Este cambio minimiza la penalizacion uso de CPU y el IO Amplification. A tener en cuenta algo que difiere también con el modelo anterior, ESA Encryption solo podrá activarse durante la creación del clúster, posteriormente no puede activarse.Un bonito warning nos lo recordará:
Por último quisiera mencionar una mejora con respecto a los Snapshots. Básicamente, desde vSAN 6.0 se usaba un método llamado vsanSparse basado en los redo logs – basicamente poner el vmdk en read-only y crear un nuevo disco hijo donde escribir los cambios. En OSA se usa una nueva estructura denominada el B+tree logical map que, sin detalles técnicos, cuando creamos un Snapshot, éste apunta a distintos bloques de datos distribuidos en nuestro vSAN Dastastore. En resumen, mejora el tiempo de consolidación, cosa que beneficia a todas las herramientas de Backup que usen la API para crear copias de seguridad. Apuntar que la degradación por uso de snapshots sigue ahí, no abuséis de ellos y eliminadlos una vez cumplido su propósito.
No me digáis que no pinta mejor ESA que OSA, OSEA, sabes ? (“Esa” ha sido buena 😉 ) Bien, ésto es todo por ahora. Próximamente buscaré hueco para ver en profundidad como son las Storage Policies en vSAN 8 ESA.
Welcome again to another #HCX personal quick note. This time I’d like to make a quick overview about one useful feature we normally miss during the Service Mesh creation. Personally, I have to confess creating a SM is the most tricky and exciting moment on a Workload Migration project. It’s the right time you wait for the tunnels to be up and green, but you are also expecting the worst :-).
But let’s be optimistic for a while and picture a brilliant Service Mesh with a whole new green tunnel between your Interconnect and Network Extension appliances at both sides of your regions. We are ready to test a migration task but moreover, we’d like to know how fast we can drive. Before version 4.4 we used to ssh our HCX Manager and run perftest tool to get some figures about the tunnel throughput and bandwidth. Well, my friend, this is so much cooler now.
Now we have a new option called Transport Analytics which basically does it for you internally and shows a fancy dashboard with the results. In fact, it can show a good estimation about the total amount of possible migrations based on the figures and limits measured. The Transport Analytics page lists all Service Mesh configurations for a site pair with a separate card for each Service Mesh.
Just go to your HCX Manager GUI and click on Infrastructure > Transport Analytics
According to the internal checks, you can have an estimation of 15 parallel Bulk migrations.- This image is from the HCX Documentation.
But there’s more under the next sections for each of the SM Services enabled. If we expand each service, we’ll have the required information to assure a good network performance and also the minimum requirements for each of type of migration.
This image comes from my lab.
We haven’t finished here because last section under this Transport Analytics dashboard is the one referred to the UPLINK itself. And there, we have the available bandwidth for both upload and download and detected latency. All in a more visual and clean mode.
And if you think we have finished, you are absolutely … wrong. Because VMware rocks and still you could click on Transport Monitor and discover the real time metrics that are being collected at that moment, well, at least the last hour, or last day or even last week or custom interval. There is no doubt this is a very nice surprise for all of those who demand a closer HCX monitoring and are not using vROoops …. I mean, Aria Operations yet. 😉
That’s all for now, hope you’d enjoyed this post. Ciao..!
VMware vSphere 8 ya está entre nosotros desde hace unos meses y, poco a poco, vamos descubriendo novedades novedosas conforme esta versión va tomando más y más protagonismo. Son muchas las novedades, desde mi punto de vista, estas serían algunas de ellas en lo que respecta a la administración y operación de vSphere:
vNUMA Configuration and Visualization
Interesante golosina la que tenemos aquí. Pocas veces se cae en la cuenta, a la hora de crear una VM, en los NUMA Nodes existentes y su perfecto alineamiento con los vCPU de nuestra Máquina Virtual. Solo cuando realizamos un Healthcheck del entorno o un estudio de rendimiento nos acordamos este concepto, que existe de vSphere 5.0 nada menos. En vSphere 8 y bajo el Virtual Hardware 20 es posible configurar la topología NUMA desde el vSphere Client, gracias a una nueva pestaña en Summary, llamada CPU Topology.
Staging Cluster Images
Como hacíamos con las Baselines del Update Manager, ahora es posible realizar el Staging de las Imágenes de los ESXi de un cluster para su posterior Remediation. Podemos hacerlo para todos los hosts de un cluster, con solo un click. Más aún, ya no es necesario que estén en Modo Mantenimiento para realizar esta tarea.
Parallel Remediation
¿Por qué actualizar un solo host pudiendo hacer varios a la vez?. En vSphere 8 podemos realizar el Remediate de los ESXi en paralelo. Nosotros decidimos que hosts poner en MM y Lifcecycle Manager se encargará del proceso aplicando el Remediation en esos hosts, hasta un total de 10. Ahí es ná.
Enhanced Recovery of vCenter
Otra golosina rica. Recordáis el castigo divino de restaurar un vCenter del Backup. Bueno antes que nada. ¿Hacéis Backup de vuestro vCSA ?. Si la respuesta es “No” ya puedes conectarte a la VAMI y realizar una copia de seguridad a tu SFTP favorito. Como decía un sabio “No hay restore, si no hay Backup y es el Restore el que tiene que funcionar siempre.”. Bueno, eso no lo dijo un sabio sino un sordo, es decir, yo mismo.
Como comentaba, si han existido cambios en nuestros clusters desde que se realizó el backup, durante el proceso de restauración podrán producirse inconsistencias pero en vSphere 8 nuestro vCenter recién restaurado es capaz de identificar qué es lo que falta en su inventario y actualizarse con los datos en tiempo real. Ésto lo consigue distribuyendo entre los ESX porciones de información que se denominan DKVS o Distributed Key-Value Store
DRS and Persistent Memory
En vSphere 8, DRS hace un análisis del uso de memoria por las diversas cargas de trabajo mediante PMEM (Persistent Memory). Como resultado, la migración de este modo no afecta al rendimiento.
vSphere Configuration Profiles
De igual manera que usábamos los Host Profiles para poder configurar de forma rápida nuevos Hypervisores, vSphere 8 presenta vSphere Configuration Profiles. Esta vez para poder definir elementos de configuracion de los objetos de un cluster. Muy similar a como trabajan los ya mencionados anteriormente Cluster Images del LCM. Mucho que probar aquí si realmente podemos usar esos objetos de configuración para poder aplicarlos posteriormente a otro cluster.
Bueno hasta aquí por hoy. Pero hay más cositas, entre ellas el próximo día comentaré novedades relacionadas con vSAN 8.
Recently I had to check what the SBPM a vSAN Cluster was using on a VCF environment. Quite a delightful surprise for me knowing this time the scope was different and we had to know the Current Storage Policy each Virtual Machine was using on a vmdk-basis. Didn’t need to identify the Cluster’s vSAN Default Storage Policy, what we really want is the Policy for every vmdk.
So, hey, I’m not a nice programmer, totally admit that, but still treasure some personal resources from those years studying ICT Systems Engineering and I was younger 🙂 … and guess what?, it works for me, and now I hope it will work for you too. So, here’s the piece of code:
The script basically prompts you to enter the vCenter name and credentials, once it establishes a valid connection, for each virtual machine it reads the vSAN disk object and the information related to its components according to the applied policy. It collects the VM Name, Health Status of the component, if the object is compliance, the host where the component resides and the type (Witness, Component, etc..)
When finished, it shows the execution time – which you can basically ignore it – it was just for fun.
Inside the same folder you’ll find two files (.csv and .html) with the information collected.
And here’s a screenshot to see how the report looks like in html:
And here’s after being imported to Excel:
Code should be optimized since the more VM’s you have in the inventory the longer it takes to finish the execution. In my case this is not going to be a daily task, so it really meets the expectations after all.
Hace apenas unos días, se ha liberado la version 4.5 de HCX. Aparentemente una más de lo que VMware denomina Maintenance Releases. Pero es mucho más que eso, desde mi perspectiva personal, considero esta version (a falta de probarla aún) muy, muy prometedora.
Antes de abordarla, aviso para navegantes: Un aviso, a modo de Warning color púrpura, menciona un cuidado especial para aquellos que tienen en marcha migraciones OSAM: .
Esta advertencia, básicamente sugiere que tengamos que hacer algo antes de actualizar: Buscar una ventana donde no haya migraciones OSAM en marcha. De lo contrario, corremos el riesgo de que esas tareas no terminen nunca y se queden en perdidas en el tiempo y el espacio para siempre. Esto supone un nuevo aspecto a considerar hasta ahora, y es que siempre hemos realizado los upgrades independientemente de si teníamos o no migraciones en vuelo. A fin de cuentas, los afectados de primera línea eran nuestros HCX Managers, posteriormente ya buscábamos ventana para poder actualizar los Appliances una vez terminaba de migrarse la ultima máquina. De modo que, mucha atención a este aviso.
Dicho esto, mención importante sobre aspectos de ésta release, lo primero, tiene una gran cantidad de fixes. Muchos, y además, algunos muy conocidos que harán que varios de nuestros clientes esbozen una sonrisa ;-).
También trae consigo la integración con vSphere 8, que prácticamente acaba de liberarse esta semana, pero una de las cosas más sorprendentes ahora mismo es usar HCX en un único vCenter; solamente para realizar Bulk migrations entre clusters, (Si, has oído bien, desplegar HCX solo en un vCenter). Inicialmente puede traer muchas ventajas para todas aquellas infraestructuras que necesiten unq gran migración de cargas dentro del mismo DC, el tiempo dirá si ha sido un acierto.
También nos encontramos con la opción de Seeding para RAV, que antes solamente era posible con Bulk. Y como no, OSAM ahora soporta RHEL 8.5 / 8.6. Como grata sorpresa, se soluciona algo que he sufrido personalmente en algun que otro cliente, se ha implementado una caché, para cargar el invantario de las redes de destino más rápidamene durante la creación de tareas de migration. También se actualiza MON, ahora admite Virtual Machines con Multiple IP Addresses.
Pero, por encima de esto, mención especial tiene lo que viene a denominarse Workload Migration for NSX V2T with Migration Coordinator. Algo que espero poder compartir aquí con más detalle próximamente. Nos leemos….
Buenos días por la mañana. Algunos proyectos de Migración suelen topar con aquellas máquinas virtuales que no están usando Hypervisores de VMware. HCX salió al rescate de este escenario y soporta migraciones de cargas de trabajo en KVM e Hyper-V.
Uno de los mayores desconocidos en HCX es OSAM (OS Assisted Migration) no solo porque el escenario es poco frecuente, sino porque es muy peculiar en cuanto a requerimientos y no es una migración sencilla, dado que lleva implícito una reconversión de la máquina virtual durante la fase de migración. Es más compleja, tarda más y tiene bastantes restricciones y limitaciones. Una de las más importantes, en términos de rendimiento, es que no permite replicar más de 50 vmdk de forma simultánea.
No voy a escribir acerca de OSAM, sino más bien de qué forma hacer el famoso Scale-Out para poder superar esa barrera de los 50 discos. Recordemos que ese límite lo sufre directamente el Sentinel Data Receiver (SDR) en destino, y no es otra cosa que la propia limitación del número máximo de discos que puede configurarse en una Máquina Virtual.
Dado que un Service Mesh solo puede tener un único SDR, la solución es tener varios Service Meshes. De éste modo, HCX nos permite – de manera totalmente soportada – tener hasta 4 Service Meshes con 1 SDR Cada uno. Esto se traduce en un nuevo tope de discos a replicar de forma simultánea, haciendo las mates, nos da un total de 200 VMDK por HCX Manager.
Inicialmente nos da muchas alas, pero hay que tener en cuenta otros factores para poder sacarle partido. Lo primero es pensar que vamos a necesitar ampliar nuestro Pool de IP’s para actualizar los Network Profiles, tanto en origen como en destino, así que hay que incorporar al equipo de networking. Además, recordemos que un Service Mesh, no es tal cosa sin su Interconnect. Eso implica que por tendremos 1 HCX-IX y 1 SGW en origen y 1 HCX-IX y 1 SDR en destino. De modo que vamos a usar más recursos tanto en origen como en destino. Concrétamente vamos a desplegar (3 SM x 2 Appliances x 2 Sites) = 12 nuevas Appliances.
OSAM Scale-Out
Además, no debemos olvidar que no va a existir una inteligencia que gestione los flujos de migracion de cada uno de los SM de forma equilibrada y balanceada. No. Seremos nosotros quienes lo tendremos que hacer dado que vamos a tener que trabajar con 4 agentes distintos, cada uno de ellos vinculado con su propio y exclusivo SGW.
Tampoco nos vale ir instalando Agentes como si no hubiera un mañana, el Sentinel Management de nuesto HCX Connector Manager tan solo permitirá tener instalados y conectados no más de 20 agentes activos. Conforme finalicen las migraciónes, podremos ir añadiendo más. Pero no es recomendable superar ese número.